What is Xpage?
 Xpage is a prototype and mock-up app designed from scratch for the iPhone or iPad. With Xpage, everyone now can create and interact with an app prototype quickly on your mobile phone.
- Not just graphics, but also native objects.
- Not just styles, but also vivid protyping by data driving.
- Design, Mockup and Document. Export objects and embed them into product documents.
Xpage can be downloaded on AppStore, visit http://xpage.pgang.cn for more infomation.
We continue to make Xpage the best mobile design software ever to fit you needs. We need you help to shape the future direction of new features and improvements. If you have any comments about Xpage, please feel free to let us know. We will reply every feedback email.
Content
- Quick Start
- Project
- Project Presentation
- Project Exporting
- Page Editor
- Gestures
- Object Basics
- Object Group
- Object Type
- Data Driving
- Event Driving
- Event
- Action
- Use Cases
- Improve Performance
- In-App Purchase
- Misc
Quick Start
There are two ways to create a prototyping:
High Quality Prototyping
- Create pages of project.
- Design pages with visual objects.
- Link the object to the target page, specify the transition for it.
Paper Work
- Make hand-drawn on papers
- Take shot and import.
- Add hot-spots to link each other.
Project
In Xpage, we can create, design, and present an App in its project.
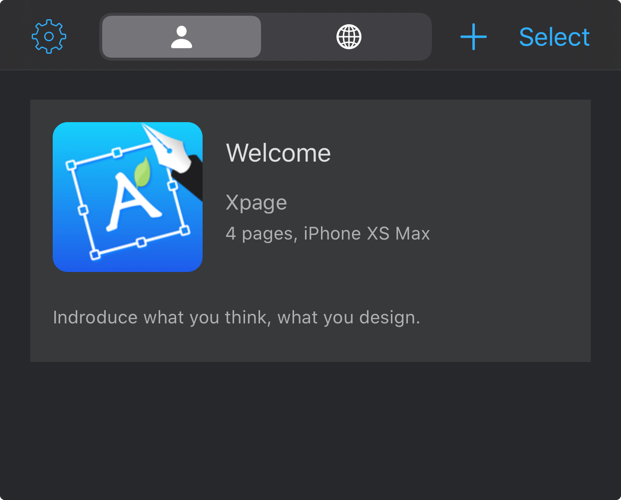
The start UI of Xpage shows all the projects. The information of each project are showed, including name, AppIcon, description , number of pages, etc.
![]()
All local created projects are located in the Local section. Click one of projects to open and edit it.
The Discovery section shows the projects shared by the other user in the world. Until now, we can review and present the shared projects, but can not modify them.
Create a New Project
In project collection view, click the ➕ button on the upper-right corner of screen to create a new App project.
We can create a New Blank project, or import from template to create by a on-boarding project template.
Choice preferred device
Some devices equip with a high-resolution screen. It is possible to design prototypes for lower resolution screen on it. In this case, we have to choice the preferred device for our new project.
A device with lower screen size will be preferred for the new project. A prototype that designed for low-resolution screen also work fine for high-resolution screen. It is false in converse.
Limits when crossing devices
There ware some limits to design a prototype for low-resolution screen on devices with high-resolution screen.
- Xpage use the native status bar ship with iOS. It always locate according to the hardware device instead of the preferred one.
- Xpage use native tab bar from iOS. If you design an iPhone prototype on iPad, the icon of item will appear at left of title instead of at top of it.
- While taking action of Video-Playback, it always play back at fullscreen of the real device instead of the preferred one.
Pages
 The project view is a gallery to displays a thumbnail for each of your pages.
In Xpage, the term 'Page' is similar to the 'Artboard', or 'Drawing', in the drawings-based app, such as Sketch, etc.
Tap a thumbnail to open it for viewing or editing.
Reorder Pages
We can drop and drag pages to re-order them as our wish in project view.Create New Page
![]()
Tap the ➕ button in the bottom-center of the screen to create a new page.
Rename Page
To rename a page, tap the title below the thumbnail to enter a new title.
Operate Pages
In selection mode, tap on thumbnails to select or deselect them. When one or more pages are selected, Tap the Trash button to delete the selected pages.
Tap Cancel to exit selection mode.
Project Profile
In the pages of a project, tap the More button to enter the 'Project Profile'.
In the 'Project Profile', we can view and edit more information of current project, export and share it.
Project Presentation
Start Presentation
![]()
Tap the Present button to present current mock-up at fullscreen.
Mirror to Mac
We can mirror the screen of iPhone / iPad to Mac by QuickTime Player shiped with Mac。
- Link iPhone and Mac with USB line;
- Open QuickTime Player on Mac;
- QuickTime Player > Menu > File > New Movie Recording, Click the arrow at the right of Record button, choice our iPhone/iPad as the video source;
Stop Presentation
![]()
To quit present mode, we can pinch, or touching with three fingers. We also can shake device to quit present mode if the shaking event hasn't been used to trigger any action.
Project Exporting
Add to Home Screen
As many applications, Xpage can add some internal operations to Home Sceeen. Xpage provide this feature to add a prototype to Home Screen, make it looks like a real app.
Since iOS 13, Shortcuts are used to add prototypes to Home Screen:

Prepare a prototype
We finished a prototype named Welcome. Let's add it to Home Screen.
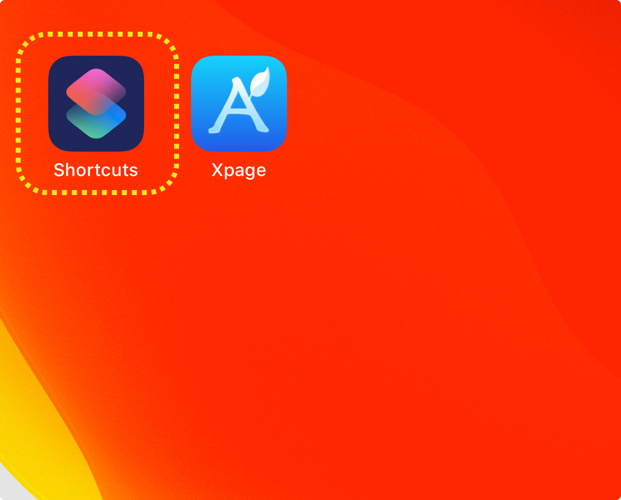
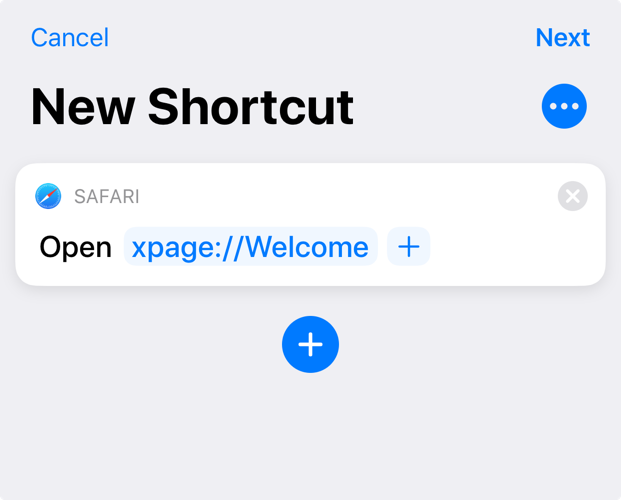
Launch Shortcuts
Returns to Home Screen, then launch Shortcuts app.
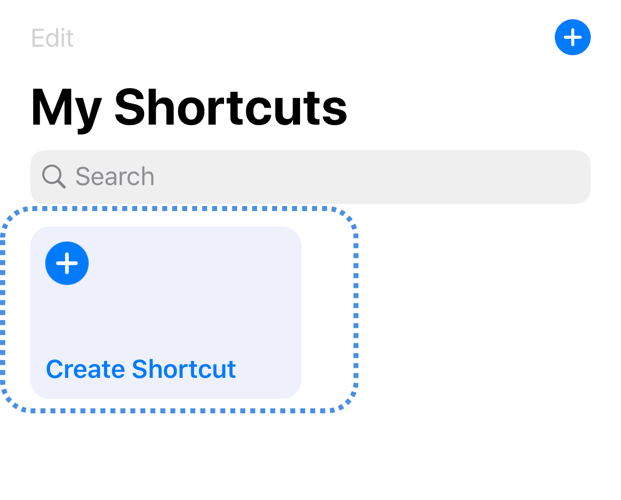
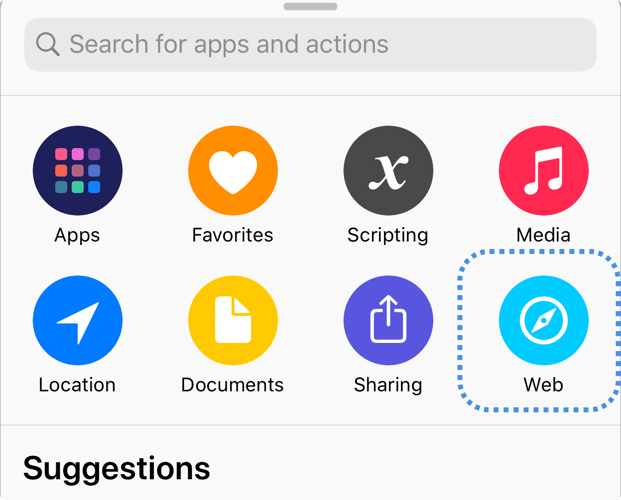
Click Create Shortcut > Add Action > Web > Safari > Open URLs.
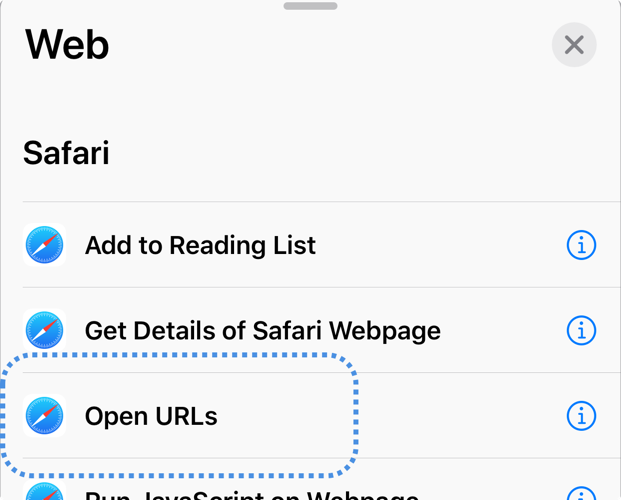
Fill URL as xpage://PROTOTYPENAME. The PROTOTYPENAME means the name of your prototype document.
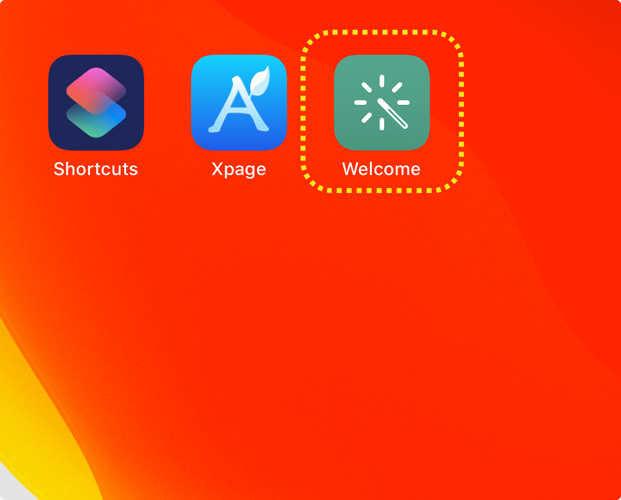
Click Details > Add to Home Screen, edit the Home Screen Name and Icon, then click Add .
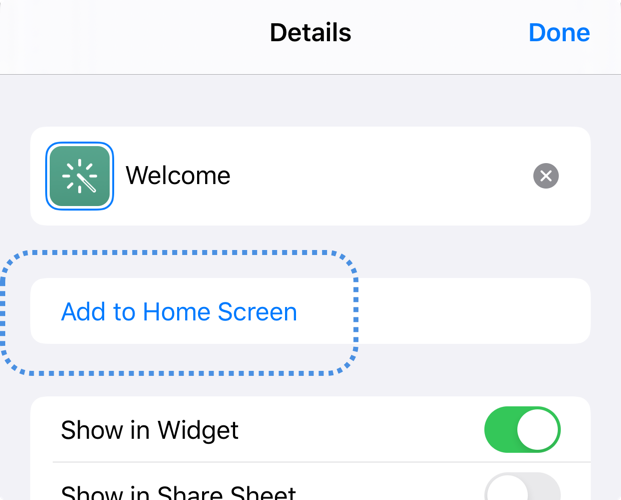
Now, a shortcut will appear on Home Screen. Click the icon to launch Xpage. Xpage will automatically present the specified prototype document.
Export Project
Enter Project Profile , tap the Share button at top-right corner.
- tap Publish to publish project to community. We can specified if it is play-only or downloadable.
- tap Xpage to export as .xpage document.
- tap Images to share pages as images
Import Project
Import from Files
To import a project from Files, click the project to pop up the dialog. Then, select Copy to Xpage.
Import from Mail
When an Xpage project has been shared with e-mail as an attachment, the receiver can tap the attachment, then choice the copy to Xpage to open it. The shared project will be imported into Xpage and appear in Local segment-control. As soon as imported, we can edit, present or share it, just as common local projects.
Page Editor
Xpage edit a page at full-screen. So, a novice who is new and has little experience in Xpage may wonder what to do next and how to return. In fact, it is very simple. Xpage has two kind of menus in the full-screen editing: Object Panel, Action Sheet.Object Panel
Object Panel, also called Component Panel, holds all components that are available in Xpage. Click an object on the panel, insert it into current page.
Slide right with one or two fingers on the left edge of screen to slide in the Object Panel .
- The edge-pan gesture with single touch is unavailable if any object selected.
- The edge-pan gesture with two touches always be available.
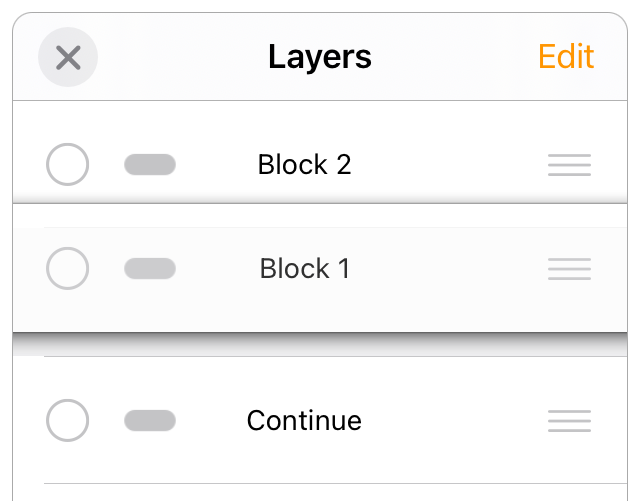
Object List
The object list, also known as layer list, is particularly useful for selecting an object that would otherwise be difficult to select because it’s layered below other objects.
Invoke the page menu by touch screen with two fingers, then select Layer List.
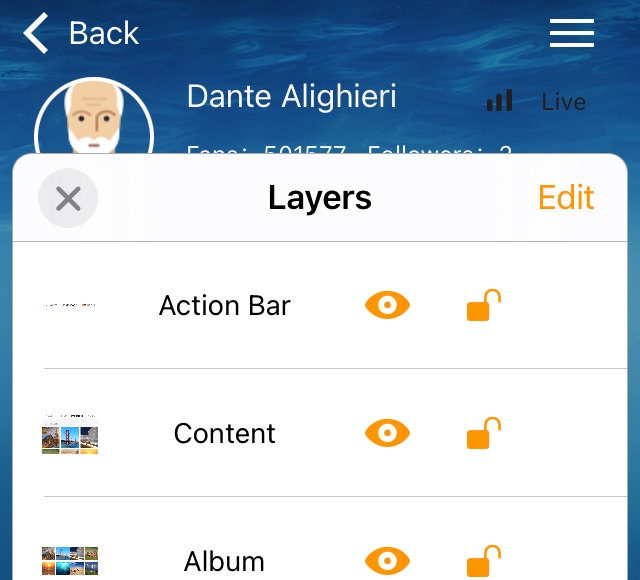
Think about a page with lots of objects. Many of them are adjacent, sometimes overlapped. In this situation, the Object List is very helpful to operations.
Select, lock, Hide, Rename
- Tap the thumbnail or icon to select. Its Edit Menu will appear.
- Tap Name to rename
- Tap 👁 to hide/unhide
- Tap 🔒 to lock/unlock
Swipe your finger from right to left to invoke the contextual actions for a row.
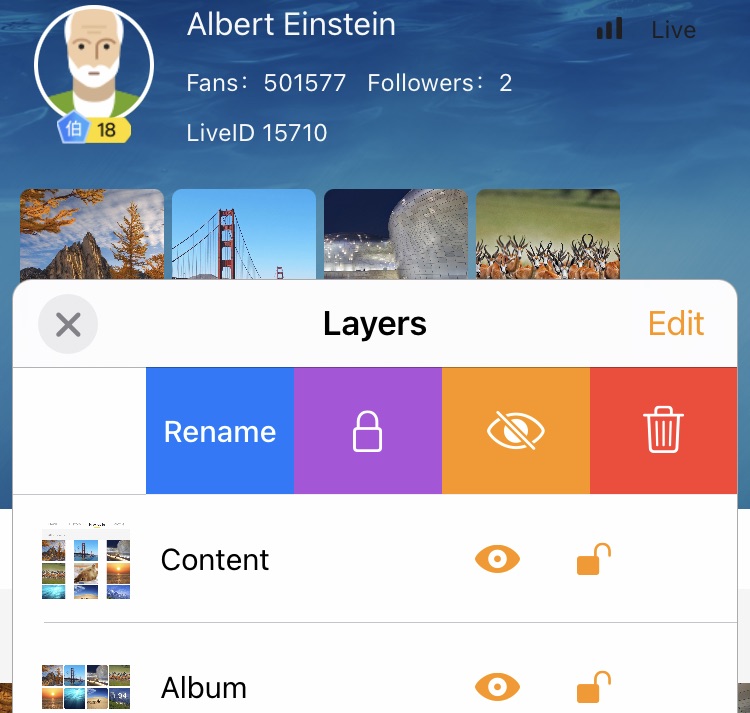
Change Layering Order, Delete, Group
In the object list, objects are shown in the layering order they appear on the page (known as the stack). You can select objects in the object list and then group, lock, or move them in the stack. To make it easier to differentiate objects in the list, you can also edit their names.
Click Edit to show the re-order icon ![]() in each row. To move an object in the layering order (stack), drag the icon above or below another object in the list.
in each row. To move an object in the layering order (stack), drag the icon above or below another object in the list.
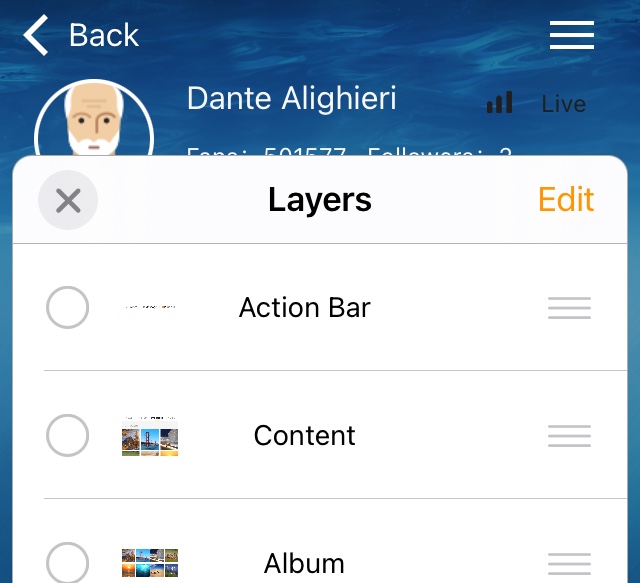
This option will also enable multi-selection to select more than one objects, then delete them, or group them into a new compound one.
Object Menu
Click object to show its context menu, so called Object Menu, also called as Quick Menu.
- Edit: Click this option to invoke the Attributes Inspector
- Action: Click this option to invoke the Action Inspector
Object Attributes Inspector
Click an object to show context menu. Then click Edit to invoke Attributes Inspector.
The Attributes Inspector lets us adjust the settings for the current object. We will see that the Inspector is divided into sections according to what object has been selected.
Tap any object on page to pop up the Quick-Menu. Click the Edit button on the menu to slide in Attributes Inspector.
Instead of Quick Edit , the Attributes Inspector is used to define precisely the properties of a graphic or object.
Object Action Inspector
Click an object to show context menu. Then click Action to invoke Action Inspector.
Preferences
To customize the page editor, touch with two fingers, then click the Preferences on the menu.
Gestures
Gestures in Editing
Some gestures applied when editing a page.
- Single Finger
- Tap a object. Select/unselect an object.
- Tap the object, then move the finger. Drag an object.
- Tap the blank. Unselect selections. Pop the Paste option after Copy operation.
- Tap the blank, the move the finger. Draw a box to select multi-objects.
- Left-Edge Pan. Pop the left-side-menu.
- Double Fingers
- Tap with two fingers. Pop the bottom menu.

- Tap with two fingers. Pop the bottom menu.
- Three Fingers
- Three-Finger Tap. Cancel the previous operation.
- Three-finger swipe. Initiates undo when swiping left, initiates redo when swiping right.
- Three-finger pinch. Copies selected text when pinching inward, pastes copied text when pinching outward.
- Shake Cancel the previous operation. Tips💡: Stop shaking your iPad! Use three-finger gestures instead.

Gestures in Presentation
Some gestures applied when presenting a project.
- Tap: Follow the linkage if a hot-spot has been tapped. Or else, blink to hint the positions of all hot-spots in the page.
- Three-Finger Tap: Stop the presentation.
- Pinch: Stop the presentation.

- Shake: Stop the presentation. - Only if the shaking event hasn't been used to trigger any action. For example, there is not an action of "shake to follow-linkage".
Object Basics
An object is any item you place on a page, including images(photos), text, shapes, tables, and charts.
Selecting
Selecting Single Object via Tap
Selecting is very easy in Xpage. To select an object on the page, just tap it. Tap it again to unselect it.
Selecting Single Object via Layer List
The powerful Layer List is the best choice to select hiden, transparent, overlapped, locked objects. Tap the thumbnail / icon at left, the object in the row will be selected, and its edit menu will appear.
Selecting Multiple Objects via Click One by One
Touch all of targets we want one by one, until the last one has been added into selection.
Selecting Multiple Objects via Dragging a Box
We also can touch the blank, then dragging a selection box. All objects in the box will be selected at end of dragging.

Selecting Multiple Objects via Layer List
Finally, the Object List also can be used to select more than one object at same time.
Cancel Selections
To cancel all selections, we can swipe right from left edge to pop up menu. This operation will cancel all selections.
Moving
Drop and Drag
Move object quickly by easy drop and drag.

Objects will become translucent during the dragging.
Auto Snaping
Auto-snaping are supported during the drop and drag.
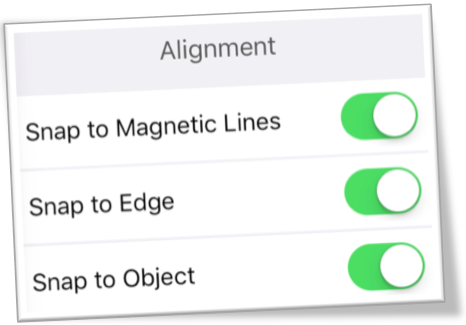
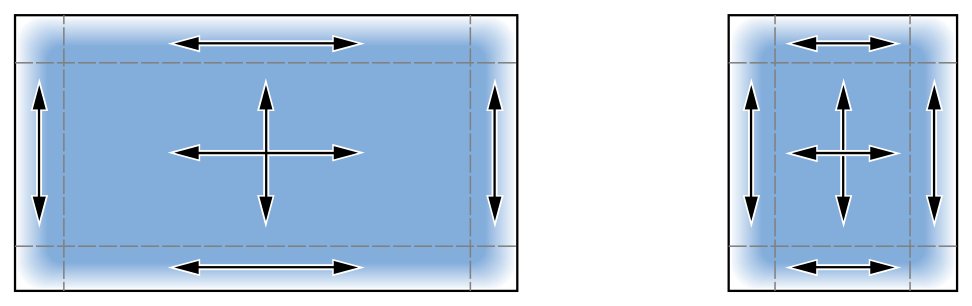
- Snap to Magnetic Lines -- Align to common places in mobile apps.
- Snap to Edge -- Align to edges of screen.
- Snap to Objects -- Align to adjacent objects.
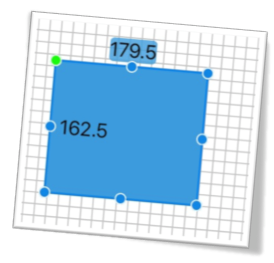
Move Precisely
Instead of drop and drag, the Attributes Inspector is used to move objects precisely.
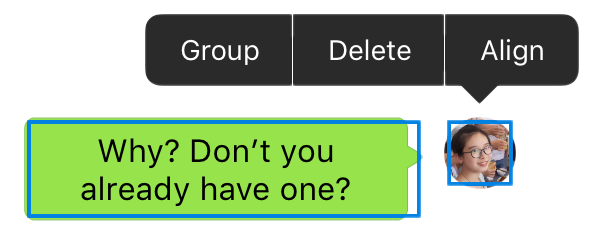
Align and Distribute
Align objects vertically or horizontallyYou can align objects so they line up along a vertical or horizontal axis.
- Select multiple objects.
- Click the Align option in the quick-menu.
- Choose an option in the align section of pop-up menu.
If two or more objects are selected, the objects align to the object most in the direction you selected. For instance, if you align three objects to the left, the leftmost object doesn’t move, and the other objects align to it.
Equally space objects
You can position objects so there is equal spacing between them on a horizontal or vertical axis, or on both axes.
- Select three or more objects.
- Click the Align option in the quick-menu.
- Choose an option in the distribute section of pop-up menu.
 Horizontally: Objects are spaced equally along a horizontal axis.
 Vertically: Objects are spaced equally along a vertical axis.
Resizing
Control Points
When an object has been selected, some blue control points will appear around it. Drop and drag these control points to quickly resize the objects.
Snap to shapes
As you resize your objects by dragging control-points,
- Rounded rectangles will snap to squares.
- Ovals will snap to circles.
Instead of drop and drag, the Attributes Inspector is used to resize objects precisely.
Corner Radius
When an object has been selected, a green control point will appear at the top-left corner of it. Drop and drag this control point to quickly adjust the corner-radius of the selected object.
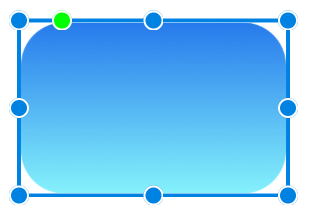
Instead of drop and drag, the Attributes Inspector is used to adjust the corner-radius of objects precisely.
Color
A favorite color can be picked from color palette, customized with color picker, or set with hex value.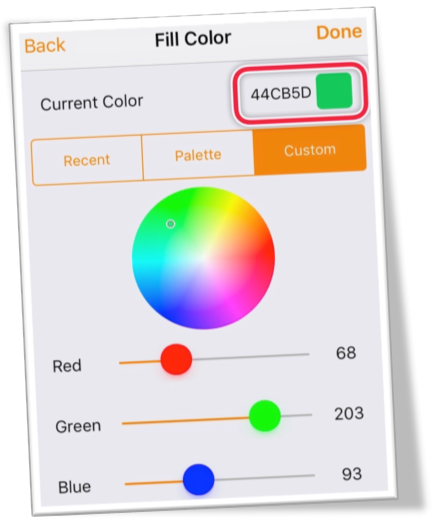
- Tap Palette to pick a color from palette.
- Tap Custom to pick a customized color with color picker.
- Tap the value label to set with hex value.
Shadows
You can apply shadows to the object, and control their colors, X and Y positions, blur radius.
If an object support multiple shadows, you can apply multiple shadows to the same object.
Shadows and inner Shadows have the same controls but work in different ways. Shadows render outside a layer, while Inner Shadows render inside a layer.

Layer
You can layer objects to create the appearance of depth on a page and then move items higher (forward) or lower (backward) in the stack.
Reorder by drag and drop
Layer objects in the Object List. Click the Sort button, then drag and drop to reorder them.
Forward / Backward
Layer objects in the Attributes Inspector. With the object selected, move an object by slider, or move it one increment at a time: Click Forward icon, or click Backward icon.
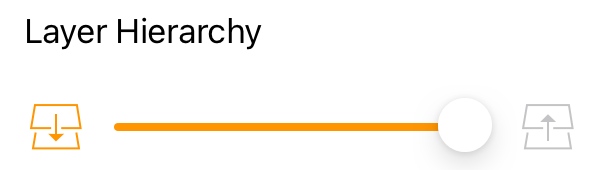
Send to Back / Bring to Front
You can also add items to the Object Menu for Bring to Front, and Send to Back. With the object selected, move an object to the very bottom or top of the stack.

Change Layers at Presentation
Xpage can process layers with bring to front or send to back commands, even remove them at presentation by Interaction > Change Layer.
Lock
When ?- To avoid inadvertently moving, modifying, or deleting an object, you can lock it.
- To set background image from start and then build on top of that with layers, we can start to edit an item, then lock it.
When an object is locked, you can’t move, delete, or modify it in any way until you unlock it.
How to lock or unlock objects
- Click the object > context menu > Lock.
- Or, locate the object on the Object List, then choose Lock. Click it again to unlock it.
Copy and Paste
Copy and Paste of Objects
- Copy: Touch the object, then clik the `copy` on the quick-menu. It will copy the selected object to clipboard.
- Paste: Touch with two fingers, then click the `paste` on the menu. It will paste from clipboard into current page.
Paste from other apps
For image or text, copy them in the other apps. After that, in Xpage, click the blank area of the current page to invoke the menu, choice Paste on the menu.
Copy and Paste of Text
For text objects, such as Labels or TextViews, their text content can be copied & pasted via text inspectors, cross the applications.
Export Object as UI assets
- All UI items can be export from Xpage as images.
- Export your assets in different pixel densities depending on what you're working on.
Enable the Export menu option at Project -> Page -> Slide Menu -> Options -> Quick Menu -> Export.
Tap the object to pop up the Quick-Menu. Click the Export button on the menu to export object as images with @1x, @2x, @3x.
Undo
To erases the last change done to the document reverting it to an older state.
- Swipe left or double tap with three fingers. Stop shaking your iPad, use three fingers instead.
- Shake the device. If it doesn't work, please make sure this option is enabled: Since iOS 13, Settings > Accessibility > Touch > Shake to Undo.
Object Group
Graphics, objects and templates can not only full customized, but also created by yourself.
Group
To create a user-defined compound object, select the objects you want, then click the group button to combine them together.
Ungroup
To ungroup a grouped object, select the object you want, then click the ungroup button to ungroup them.
Modify the grouped objects
To rename/modify the items that were grouped, or change layout of a compound item:
- Step 1: Tap Ungroup to ungroup them.
- Step 2: Modify the properties, layout, or rename.
- Step 3: Tap Group to regroup them again.
Play with the grouped objects
After grouping, grouped (sub-)objects still respond to the touch event, while the compound object as a whole object is not. Any grouped objects which is linked and driven by touch event, should be driven by sub-objects in them.
Save as template
Click Save as template, save the grouped objects as user-defined object template, reuse them later.
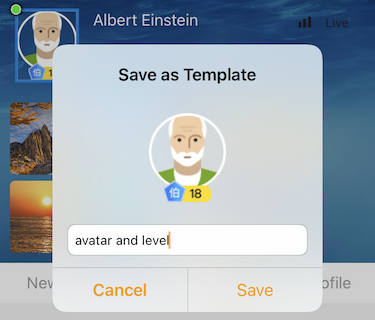
The user defined templates will appear in the Object Pabel. They are managed by the Preference menu.
Object Type
Label
A Label is a object that displays one or more lines of informational text. Labels can display any amount of static text, but are best kept short.
Format
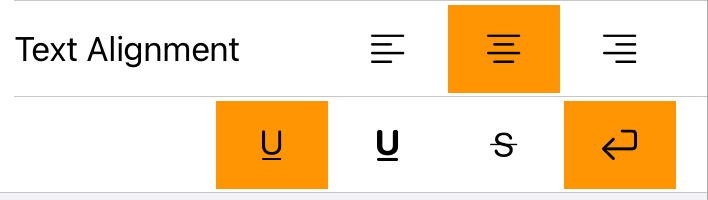
![]()
single underline and double underline.
![]()
strike-through.
![]()
auto-wrap if the height is large enough.
If we need to display a scrollable paragraph, use Scrollable Text instead. If we want to add backgound color, background image or borders to Text, or add Text to Rectangle, use Button instead.
TextView - Scrollable Text
TextView is a scrollable, multiline text region. In addition to the normal text-related attributes, TextView has its specific attributes.
Shows Scroll Indicator
A Boolean value that controls whether the scroll indicator is visible.
Selectable
A Boolean value that indicates whether the text view is selectable.
Image
There is a standalone Image object in Xpage. On the other hand, many objects handle with images.
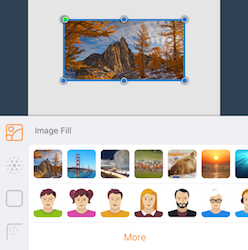
Import images
Which image you prefer? Touch it in the gallery.
- On-boarding Images: These images included in the Xpage bundle, in other words, on your iPhone/iPad.
- Stock Images: Choice an image in the stock on network. The stock manager provide a way to insert, delete, or update the URL address of images. We can open Main Menu > Stock Image > New, click to edit, paste the url of the custom photo here.
- Photos:In Attributes Inspector, tap the ➕ button to visit our Photos library , or Take shot to get a new photo, then use it in your project.
- Files: Pick image from Files app.
- Camera: Take a shot by the camera, then use it directly.
Conent Mode
- Stretch - Scale the content to fit the size of itself by changing the aspect ratio of the content if necessary.
- Fill - Scale the content to fit the size of the view by maintaining the aspect ratio. Any remaining area of the view’s bounds is transparent or a fixed background color.
- Fit - Scale the content to fill the size of the view. Some portion of the content may be clipped to fill the view’s bounds.
Image Size
Images are not only resized in normal ways, but also in Resize to Content Size in Attributes Inspector. Images will scale-aspect-fit the page if it exceed the size of page.
Oval, Triangle, Polygon
In addition to rounded-rectangles, graphics that based on ovals, triangles and polygons are also supported by Xpage. Neither corner-radius nor shadows supported by these additional shapes.
Button
Button is a predefined object which consist of an icon, a title label and a background rectangle (image filled or color filled).
Background Image
A stretchable image is one that defines regions where the underlying image data can be duplicated in an aesthetically pleasing way. Stretchable images are commonly used to create backgrounds that can grow or shrink to fill the available space.
Using insets to define stretchable regions.
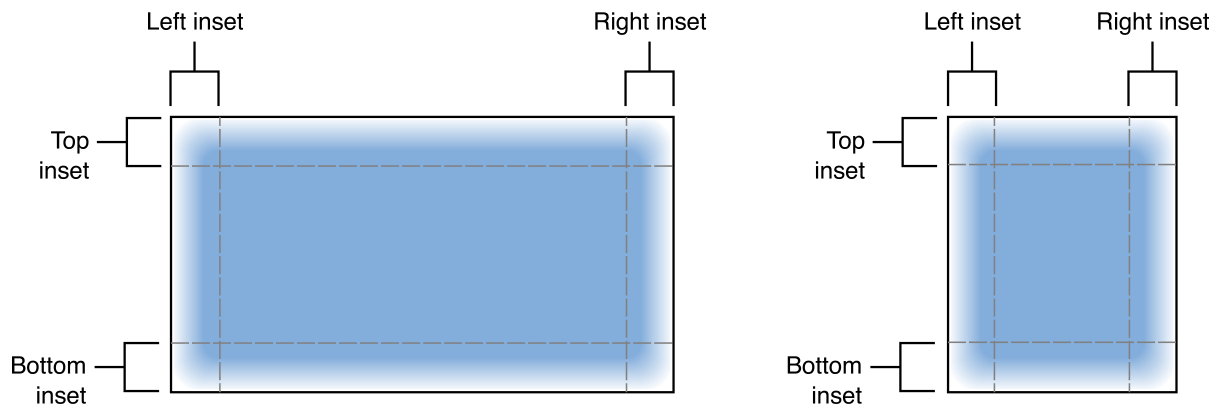
Stretchable portions of a nine-part image
Button Specific Actions
Button has its own actions:
- Set Title: Set the text of the title label.
- Set Title Color: Set the text color of the title label.
Status Bar
There is no standalone Status-Bar object in Xpage. Instead, Xpage apply the iOS native status-bar.
- To avoid of the conflict between the fake and the native.
- It may be weired if we design a project for iPhone on iPad. It always locate according to the real device instead of the preferred device. Visit Choice preferred device for more information.
Tab Bar
There is no standalone Tab-Bar object in Xpage. Instead, Xpage apply the iOS native bar-bar.
It may be weired if we design a project for iPhone on iPad. It always shows according to the real device instead of the preferred device. Visit Choice preferred device for more information.
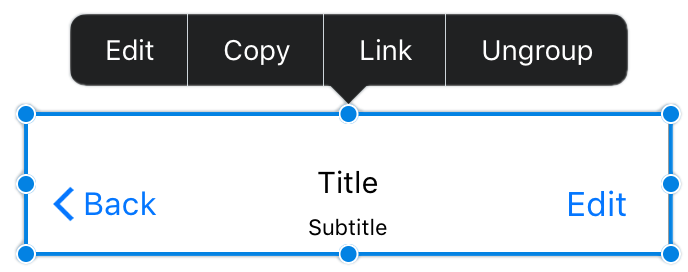
Navigation Bar
Navigation Bars are based on iOS native navigation bars.
In design, we can not change the height of these bars, which is designed by iOS. If you are realy want to do so, use the grouped navigation bars instead.
Playback Progress Label
Playback Progress Label is very useful if our protyping contains some kind of media playback features. At presentation, it will generate its text automatically to show the total duration and the current progress of media during the playback, similar to SS:MM / SS:MM.Data Driving
Xpage is data-driving instead of draw-driving.Variable, Data Binding
Each variable is a data buffer. If an object is data-driven, it support data binding that up to one or more variables.
- General Variables:There are three general-purpose variables in Xpage. They are ofen used to change text or values dynamically.

- Fill Variable To change the image or color of an object during the presentation, set its fill to dynamic fill at edit mode, then change the value of Fill Variable during the presentation.
Scope of Variables
The scope of variables is Project, instead of the current page. In fact, to prevent the side-effect of variable-crossing-page, we often execute the action of clean-variable when the page appear.
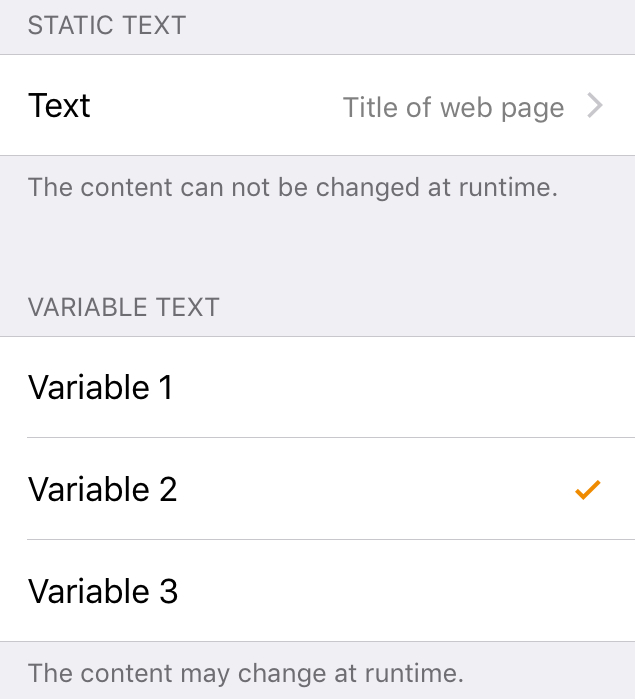
Text
In Xpage, the Text objects, including Label and Paragraph, will not only show static contents, but also be driven by Data Source.
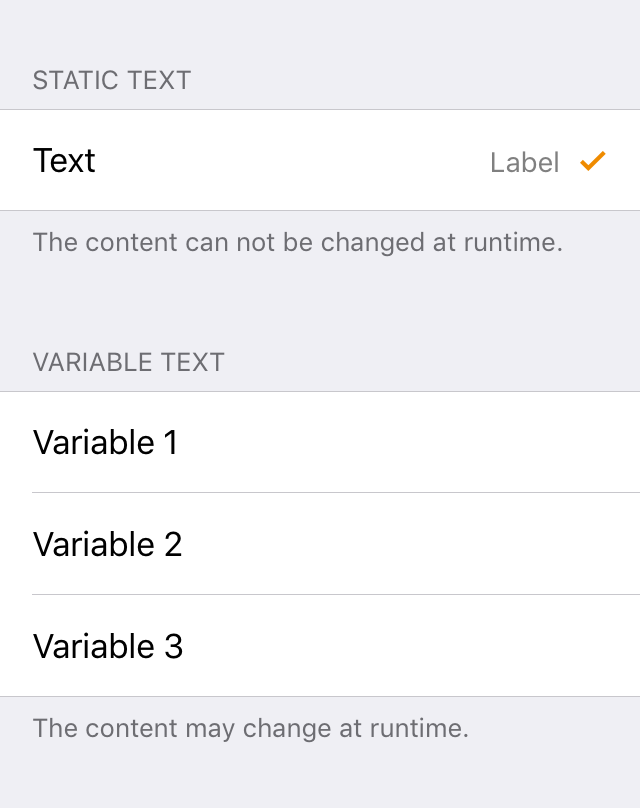
- Static : Shows contents input at edit mode.
- Var 1 : Shows contents in the variable 1. It's the general purpose variable.
- Var 2 : Shows contents in the variable 2. It is ofen used to show current time of current Audio/Video media.
- Var 3 : Shows contents in the variable 3. It is ofen used to show duration of current Audio/Video media.
If Offset and Length has been specified, just partial contents in the variable(buffer) will be showed.
We can attach a Prefix and Postfix to variable text. For example, shows " N Copy" while the value of N is changed by a Stepper object.
Stepper
The Stepper object can write the current value to one or more varaibles.For example, we can setup the Bond to Var 1 of a Stepper as true at edit mode. Click to change its value in present mode. Xpage will refresh the content of Var 1 with the current value of the Stepper .
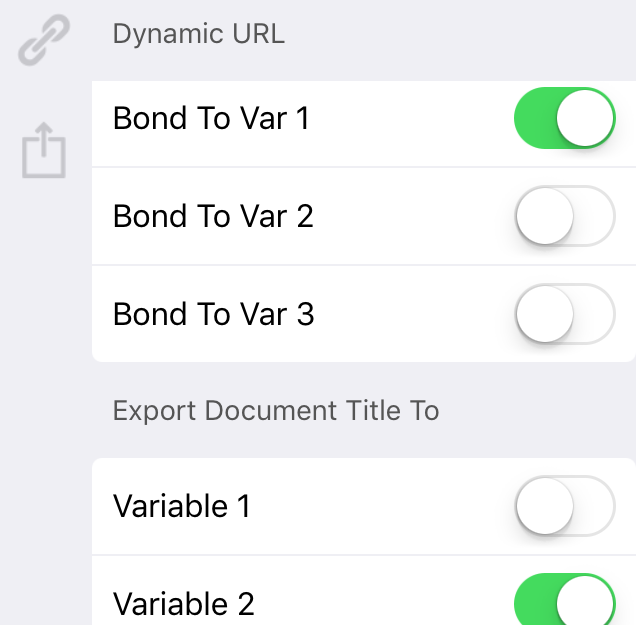
WebView
Dynamic Address
More than a static URL address, WebView object can request URLs in variables.
Export Document Title
Write the title of document after a web view finishes loading a frame.
Basic Skill
Click and jump easily by WebView object.
- Create some pages which include some Webview objects.
- Create some objects, link them to the pages above.
- Run it, click and jump.
Recognize, Go!
Sometimes we want to jump to any URL addresses, even variable at runtime. See Recognize, Go! for more information.
Table,Collection
TableViews are driven by Data Template , so do CollectionViews.
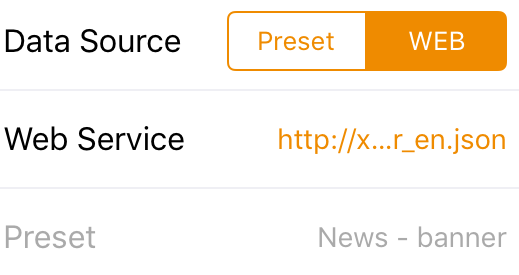
Some predefined data templates are provided by Xpage. Just choice one to apply by Attributes Inspector.
To fit the different needs of the different users, invoke the Data Template Manager to customize the data templates.
Further more, data templates even work well with Web-Service API. To serve with real data, just provide a URL. This URL should returns data with JSON specification. There is a example:
{
    "name" : "My Data",
    "sections" : [
        {
            "title" : "Section 1",
            "cells" :
                [
                    {
                        "image" : "http://www.demo.com/1.jpg",
                        "title" : "Title 1",
                        "subtitle" : "Subtitle 1"
                    },
                    {
                        "image" : "http://www.demo.com/2.jpg",
                        "title" : "Title 2",
                        "subtitle" : "Subtitle 2"
                    }
                ]
        },
        {
            "title" : "Section 2",
            "cells" :
                [
                    {
                        "image" : "http://www.demo.com/1.jpg",
                        "title" : "Title 1",
                        "subtitle" : "Subtitle 1"
                    },
                    {
                        "image" : "http://www.demo.com/2.jpg",
                        "title" : "Title 2",
                        "subtitle" : "Subtitle 2"
                    }
                ]
        }
    ]
}
Chart
Pie Chart and Bar Chart are data driven. Their appearance will be different according the values of their items.
To change the appearance of Pie Chart, invoke the Attributes Inspector, set Current Item to the intex of item should be assigned, then set the Item Value. Operations of Bar Chart is similar.
Event Driving
Event vs. Actions
Xpage prototypes are driven by event. One or more actions can respond to each event.
There are two kinds of events in Xpage.
- Page Event
- Object Event
Accordingly, there are two kinds of actions in Xpage:
- Page Action
- Object Action
Conditions for Actions
We can set one or more conditions for our actions.
In the Action-Sequence Inspector, press down and hold on an action, then swipe the finger to right, the inspector will show how many conditions are required before the execution of this action. Click on this, enter the Condition Inspector.
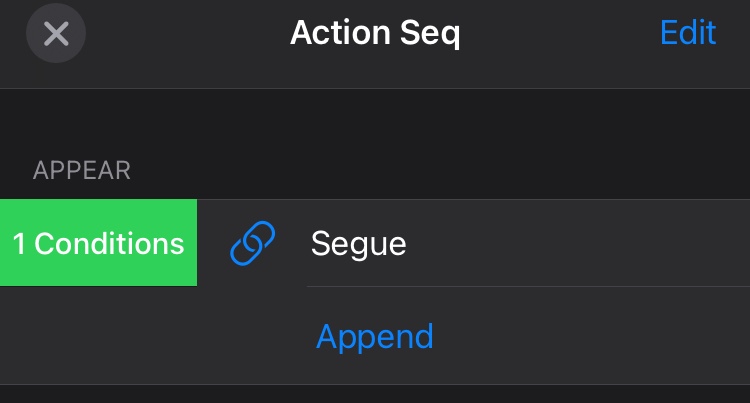
When event is triggered, take a sequence of actions. Each action is taken ONLY IF all of its conditions are met.
Supported Conditions
- Math comparision: Check if the value of operand 1 is larger than,equal to,or less than the value of operand 2.
Event
Page Events
Page Events
Page events apply on the whole page, and is used to trigger one or more Page Actions .
- Appear - when page appeared. It may trigger multiple actions concurrently.
- Shaking - when shaking the device.
- Data Monitoring - when the changing of the length or value of the specified variables.
- Swipe Left - when finger swipe from right to left.
- Swipe Right - when finger swipe from left to right.
- Timer - when the timer fired for the specified intervals.
- End of Play - when the audio/video play back ended.
Object Events
Object events apply on a single object, to trigger the Object Action of this object. Most of objects support a event by default: Touch .
Some object events:
- Appear - supported by most objects.
- Click - supported by most objects. But somes are not, such as Grouped, Picker.
- Object-Specific - supported by the specified object. For example, the QRCode-Scanner object supprt event of Recognize-Succeed
General Events
There are three general purpose events in Xpage. Both page and objects can respond to these events.
- Event 1
- Event 2
- Event 3
Action
Most actions can not only play as page actions, but also object actions.
Page Actions
Page actions are response to page events.
Object Actions
Object actions are response to object events. Some common actions are supported by most of objects, such as Link. On other hand, object-specific actions are supported by the specific objects. For example, Set Title for Button object.
Link & Segue
Object based
Each object on the page can add a linkage if it support to. To specify the target page of an object linked with, setup the linkage property of the object directly on the Object Menu. We also can do it by the Object Action Inspector.
- For most objects, it will setup the first responding action for the touch event. It will be set to Segue.
- For Table & Collection, it will setup the target page of the first element.
Hotspot based

- Insert an object from panel.
- Move it to the position what we want, link it to the target page.
- Click ‘None’ to disable its fill to make it invisible. NB! Don’t set its opacity to zero.
Page event based
The transition also can be based on page instead of object. If a kind of event property and the linkage property of page was set properly in Page Events.
Segue
Tranditional slide projector see content as a series of sliders, then slide them to next, or return to previous. Tranditional see content as a series of pictures, then link them in two-dimensional. In Xpage, a page segue to another in 3D.
There are 2 segue method in Xpage: Push and Pop.
Input Real Data
In presentation mode, Xpage can input real data, text or numbers, handle them as wish.

First, an object on screen can be treat as a key on some kind of keyboard. Press these keys to input real data, text or numbers, handle them as wish.
The value of each key can be assigned by Input Value, also called Operand. When a key was touch down, its value will be calculate by Input Method.
How to handle the Input Value is determined by Input Method property:
- Assign :Assign the value to the variable, or replace the current value of it.
- Increase :Increase the variable by value, or decrease it when the value is a negative.
- Append :Append the value of the key to the end of variable that bond to.
- Clean :Clean the value of the variable immediately. It means remove all content in the buffer.
The QR-code Scanner object also can be used to input a text, URL, or numbers. When a QR-code was recognized successfully, the result will be saved into variables automaically.
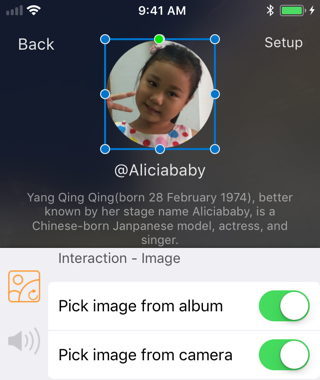
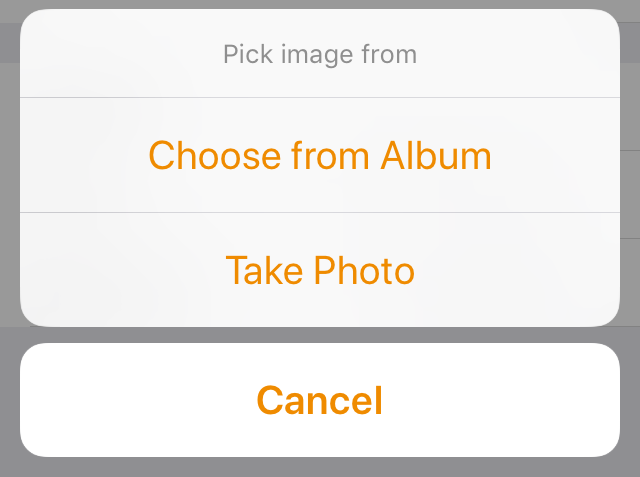
Input Real Photo
At presentation mode, Xpage can input photos in real world.
Some properties of objects are used to support this feature:
- Preset:Choose an image from image stock, save it into the image variable.
- Choose from Album: Choose a photo from album, save it into the image variable.
- Take Photo: Take photo by camera, save it into the image variable.
- Clean: Clean up the current content of the image variable.
To replace the image at runtime, insert an image object that shows the image from Image Variable. Then, enable the Choose from Album or/and Take Photo attributes.
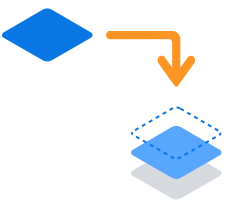
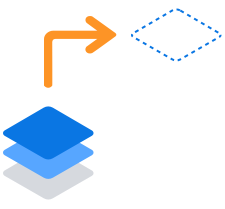
Change Layer
Xpage can process layers with bring to front or send to back commands, even remove them at presentation.
- Bring to Front
- Send to Back
- Remove
Tutorial Project: New Project > From templates > Interaction
Show Alert
In edit mode, assign a Show Alert action for an object, design its style, title and actions.
In presentation mode, show an alert, then interact with its actions.
NB! Show Alert action can not work with Play Video at Fullscreen action.
Auth via Biometrics
To use TouchID/FaceID, you must:
- Purchase the IAP named Advanced Interaction, or the All-In-One.
- Open your page to edit.
- Open quick menu > preferences > object context menu > action, enable it.
- Insert a basic object, such as rectangle, oval or image, etc.
- Click this object to show its context menu, click act > auth via bio, enable it. Post some events as your wish.
- Handle the events from you.
- Play your project.
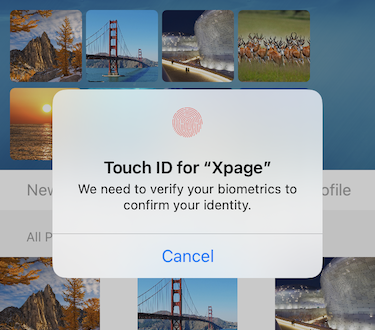
There is also a demo project in the community. Open Shared > BioAuth, play it to run. Your device must support TouchID/FaceID to run it.
Animation
To run animation in your projects, make sure the option has been enabled: Quick Menu > Preferences > Object Inspector > Animation.
Some actions will run an animation:
- Location
- Move to [X, Y]
- Move by [∆X, ∆Y]
- Size: Change the value of Width and/or Height.
- Color: Change the value of color. This feature doesn't support gradient colors or images.
- Opacity: Change the value of opacity of object.
- Corner Radious: This take effect on rounded rectangles.
- Rotate: Rotate by 0~360 degrees.
Parameters that are supported by most of animation:
- Duration: The duration of animation, as seconds.
- Auto-reverse: Run the animation backwards and forwards (must be combined with the repeat option). This option is only supported by a few animation such as rotation, color, etc.
- Repeat: Repeat the animation indefinitely. This option is only supported by a few animation such as rotation, color, etc.
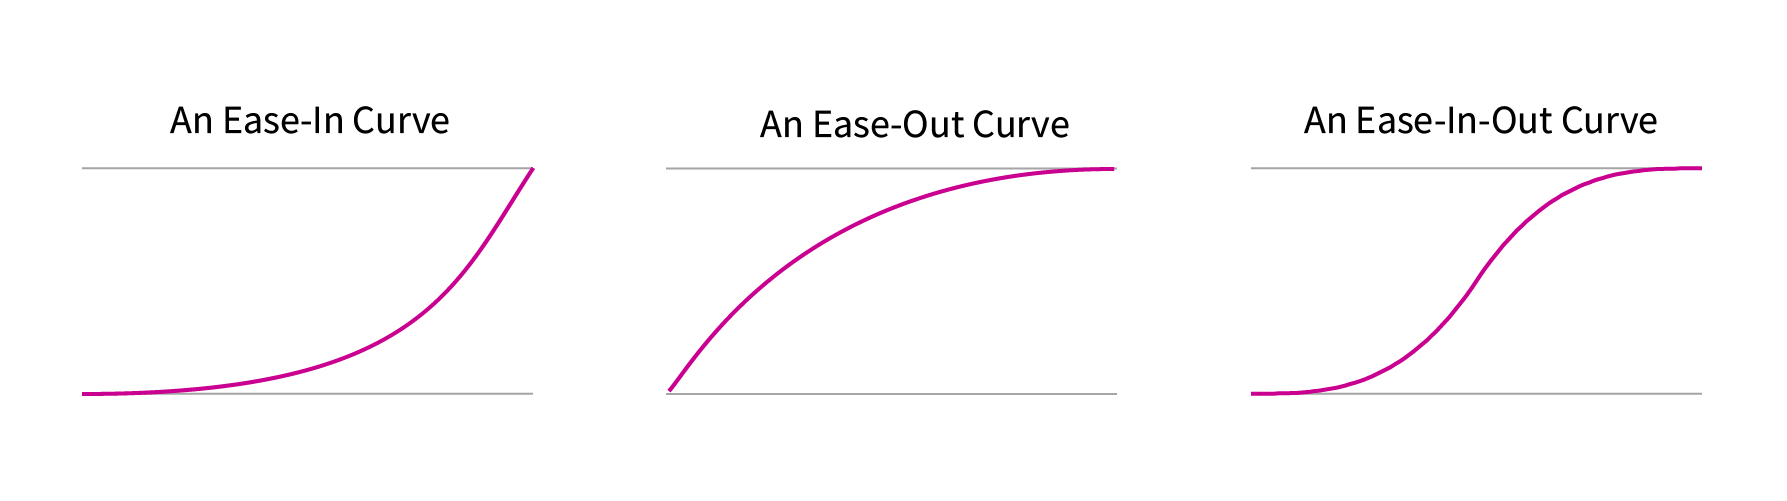
- Curve: This option is only supported by a few animation such as rotation, movement, etc.
- Linear: A linear animation curve causes an animation to occur evenly over its duration.
- EaseIn: An ease-in curve causes the animation to begin slowly, and then speed up as it progresses.
- EaseOut: An ease-out curve causes the animation to begin quickly, and then slow as it completes.
- EaseInOut: Specify an ease-in ease-out curve, which causes the animation to begin slowly, accelerate through the middle of its duration, and then slow again before completing.
Play Audio
In presentation mode, take action of play-audio to play back an audio or system sound.
When the audio is playing, Xpage will fill the Var 2 with the current time of this media, and the Var 3 with the duration of this media.
Play Video
Playback a video.
The video is played at full-screen on iPhone, and covered the objects below. When the video is end, thease objects will appear again, and trigger their on-appear event.

Use Cases
Make phone call
To make phone call from App prototypes:
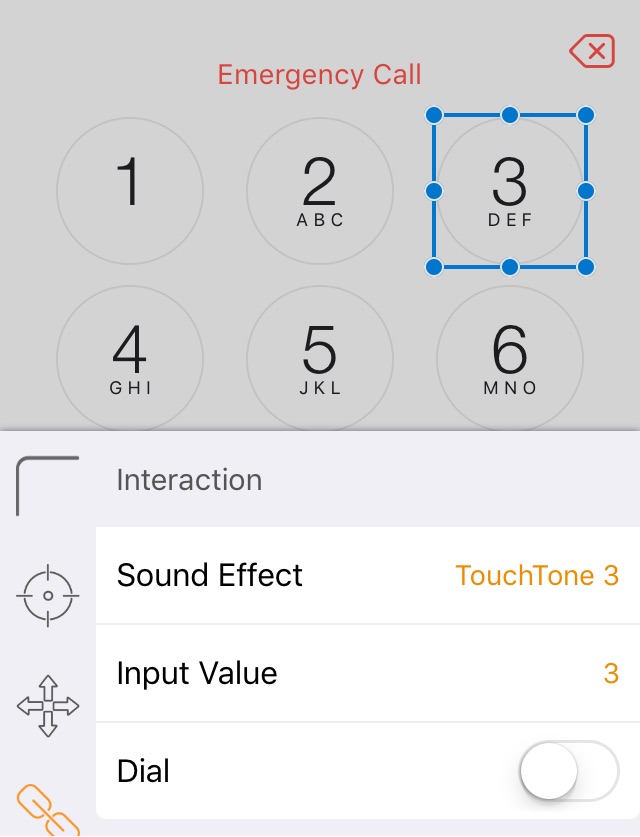
- Add some objects as the keys of numbers. Set their Input Value property properly. Set their Input Method to Append. Set their Data Binding to Bond to Var 1. To representing things as they are in real life, add Sound Effect to these keys.
- Add a Text object to show current numbers. Set its Data Source to Var 1.
- Add an object as the 'delete' button, set its Input Method property to Clean.
- Add an object as the 'call' button, set its dial property to true.
Let's dial!
- Goto present mode.
- Press keys to input phone numbers.
- Touch down the 'call' button.

Recognize, Go!
Challenge: visit the URL specified by a QR code ?
Ready, Go!
Enter edit mode,
- Insert a QR-Code Scanner object, enable the Bond to Var 1 for it.
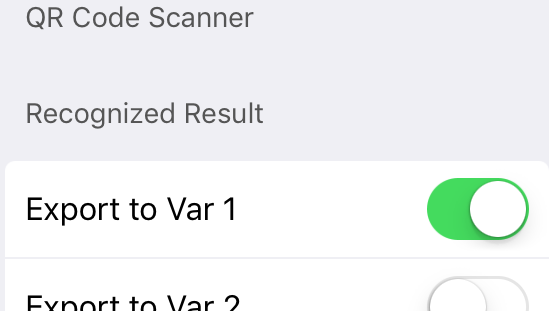
- Insert a WebView object, then enable the Bond to Var 1 for it too. Then, enable the Export Title to Variable 1 attribute.
- Insert a Label object to show the title of web page which returned from the website. The text source attribute of it should be From Variable 2 .
In present mode, the camera will be activated and start scanning. Scanning a QR-code that point to a website will cause its content display on the WebView, and its title display on the Label.

Improve Performance
Remember, the more objects or details, the more payload for Xpage.
Disable Autosave
If there are lots of objects in the design, enable Auto Save feature will reduce the performance of editor.
Consider disable the autosave feature to improve performance.
Avoid Large Images
Large images cost lots of hardware resources. Instead,
- Embedded images are preferred. All of them are optimized for size.
- URL based images are preferred. - especially those of small sized.
- Thumbnails are preferred, instead of originals, when pick image from Photolibrary, Camera or Files.
Simple Design
Disable shadows, blurs, even textures during the design.
Hide Unnecessaries
More objects in the design, more need of hardware resources.
Hide all obejects if they are not necessary.
In-App Purchase
Features Locked
Xpage will pop a message on your device when the purchase succeed.
But, if it is not. If the features are still locked after purchase, it most suffer the dis-function of the connection between you and AppStore. In most cases, the problem was gone after retry, it means 'click Restore button', after a while or a day.
How many devices can I use with one subscription?
Unlimited. Download Xpage and tap the "Restore" button at the bottom of the purchase window on your new devices.
Do I loss my work if I unsubscribe or subscription expires?
Never. You'll keep any work that you've created regardless of you subscription status.
Restore
If you have removed Xpage from your device, then restalled it. All In-App Purchase items must be re-activated before use them. Click the Restore button at the bottom of the IAP UI.
Misc
Backup
It is recommended that you regularly back up your documents. You can do it by Export to Mail, give them different names for different versions.
⚠️NB! iCloud is designed only for synchronization, not for backup.
TestFlight
Xpage always keep the backward compatibility. Furthermore, you can roll back to recent history versions at any time by enroll in the Apple TestFlight.
To enroll in the Apple TestFlight, you can click Join Xpage Beta on the main menu. It appears ONLY when Xpage open new public enrollment,